Mount Gunbad: Difference between revisions
(Additional updates and adding more info.) |
(Adding in updated boss guides and new images for left wing. Keeping all Legacy guides and would like to find a way to merge some of their helpful positioning shots.) |
||
| Line 29: | Line 29: | ||
== Your first Gunbad == | == Your first Gunbad == | ||
[[File:Gunbad_Starting_Zone.jpg|thumb|Landing area]] | |||
If it's your first time in the Dungeon, make sure to take the '''Blue Repeatable quests''' given by the NPC in the starting room. | If it's your first time in the Dungeon, make sure to take the '''Blue Repeatable quests''' given by the NPC in the starting room. | ||
| Line 36: | Line 36: | ||
== Layout == | == Layout == | ||
[[File:Gunbad-Detailed-Minimap-Final.jpg|thumb|Mount Gunbad Minimap]] | |||
Gunbad features three wings: Left, Right, and Middle. These three can be completed in any order. | Gunbad features three wings: Left, Right, and Middle. These three can be completed in any order. | ||
| Line 42: | Line 43: | ||
To fight the final boss of each wing, you'll need to kill the bosses prior to it in order to open the magical barriers that allow entrance. | To fight the final boss of each wing, you'll need to kill the bosses prior to it in order to open the magical barriers that allow entrance. | ||
== Lore == | == Lore == | ||
| Line 57: | Line 57: | ||
Quests in Mount Gunbad reward the '''Redeye Set'''. These can be picked up from an NPC with a blue icon above its head. The quests will reward you with the individual pieces after certain bosses three times. The quests marked with a green icon do not reward the set and some may not work as of yet. | Quests in Mount Gunbad reward the '''Redeye Set'''. These can be picked up from an NPC with a blue icon above its head. The quests will reward you with the individual pieces after certain bosses three times. The quests marked with a green icon do not reward the set and some may not work as of yet. | ||
== Boss | == Legacy Boss Guides == | ||
*[[Brood Mother Szikalax]] | *[[Brood Mother Szikalax]] | ||
| Line 89: | Line 87: | ||
====Final Boss==== | ====Final Boss==== | ||
*[[Glomp da Squig Masta]] | *[[Glomp da Squig Masta]] | ||
== Updated Boss Guide == | |||
The guides below are new and are still WIP. Some may be missing and will be added soon! In the meantime, you can reference the legacy guides, above. | |||
== Left Wing == | |||
The left wing has Four Bosses and Two Optional Bosses. If mechanics are working properly, this is by far the most difficult wing in the entire dungeon, due purely to its final boss. | |||
At the time of writing this wiki page, the final boss in the Left Wing is bugged and not all mechanics are working properly, which makes it a relatively easy tank-and-spank. | |||
From the entrance, head Left and across the bridge to start your path to the first pair of bosses. Clear the adds and once you enter the first large room, take a left and head to the Healer NPC. | |||
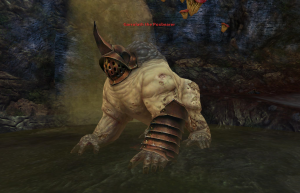
[[File:Griblik da Stinka.png|thumb|Focus Griblik, the Squig boss, first.]] | |||
You can drop off behind the healer NPC and survive the fall if you're careful, so do this in order to skip a number of mobs. | |||
Clear the nearby mobs and note that the first boss is just ahead of you! | |||
== First Boss: Griblik Da Stinka == | |||
Girblik Da Stinka is actually a dual-boss fight, and your party can handle it a few ways: | |||
*Have a solo tank pull and hold both bosses at once. | |||
*Have an off-tank pull the Wyvern boss and keep it away from Griblik. | |||
*Have a sturdy DPS or Healer pull the Wyvern boss and keep it away from Griblik. | |||
Any of these combinations can work depending on your gear and team composition, so feel free to adapt if you need to. Remember: there's no single "right" way to clear most bosses. | |||
Key Mechanics: | |||
*Focus down Griblik, the Squig boss, first. Once he's dead, you can skip killing the Wyvern and just run to the next boss to leash it, if you'd like. | |||
*The Wyvern boss will spawn Eggs during this fight. Avoid using AOE damage or direct damage here, as these eggs will pop, causing a number of baby champion Wyverns to get very friendly with your face. (This is bad.) | |||
*Your cooldowns will get constantly increased on this fight, and you'll get pulled into the air. Be ready for this and keep life-saving morales like Shield Wall (Tank) or your Healer's M3 absorb for those moments when things get rough. | |||
Once Griblik is down, you can either burn the Wyvern or just skip it and move the group towards the next boss. (It'll leash as you approach the next boss, Bilebane the Rager.) | |||
== Second Boss: Bilebane the Rager ''(Optional)'' == | |||
[[File:Bilebane the Rager.png|thumb|Bilebane the Rager.]] | |||
Bilebane the Rager is technically an optional boss, but almost every group kills him because he's very much ''in the way'' to the next boss. | |||
Key mechanics: | |||
*Tank him facing away from the group. | |||
*Be ready to quickly heal the tank and those in melee range from sudden damage bursts. | |||
Beyond that, he's a very easy boss. Bilebane the Rager drops Gunbad Jewelry, and has a chance to drop the rare purple variants. | |||
Now, head into the next room to find... | |||
== Third Boss: Garrolath the Poxbearer == | |||
[[File:Garrolath the Poxbearer.png|thumb|Garrolath will send everyone flying. Manage your positioning accordingly!]] | |||
Garrolath the Poxbearer is the third boss of the Left Wing, and a relatively simple encounter. | |||
Before fighting him, be sure to clear out the adds within the room so your party has some room to manuever. | |||
Key Mechanics: | |||
*Tank the boss with your back to the Waterfall / Wall behind him. This boss does large knockbacks, and this will keep you (and your dps) from getting flung too far. | |||
*The boss will summon Nurgling champions. Your off-tank, sturdy Healer, or DPS should pull these Nurglings and keep them away from the boss while killing it. | |||
*If the Nurgling and the Boss are kept near each other, the Boss will begin to heal considerably. | |||
That's all for Garrolath - once dead, grab your bag and move on - an optional boss lies just ahead! | |||
Revision as of 11:26, 7 July 2022
| Mount Gunbad | |
|---|---|
| GB | |
 Mount Gunbad loading graphic | |
| Location | The Badlands |
| Race(s) | Greenskin (formerly Dwarf) |
| Instance info | |
| Type | Dungeon |
| Advised level | 40 |
| Minimum level | 32 |
| Player limit | 6 |
Mount Gunbad
Mount Gunbad is the first level 40 dungeon in Return of Reckoning, and is located in the northwest corner of The Badlands (entrance at 4k,4k).
- This dungeon grants the Red-eye set, which unlocks the Conqueror Ward.
- Every member of your party will get rewards for every boss kill via PQ Bags: 2 Gold, 2 Purple, and 2 Blue. Gold bags include Red-Eye set pieces.
- Mount Gunbad is also one of the only dungeons that drops rare Eternal Seeds for Cultivating, which have a (tiny) chance to drop from any enemy mob of Hero rank or above.
It is possible to take quests within the dungeon starting at level 32, and experienced guilds / groups should have no problem including players in the mid-high 30's.
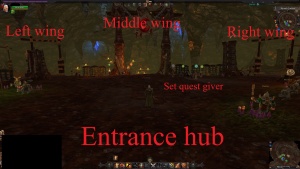
Your first Gunbad
If it's your first time in the Dungeon, make sure to take the Blue Repeatable quests given by the NPC in the starting room.
These quests will guarantee you Red-eye armor after defeating certain bosses three times. Just in case you don't roll gold bags, this is a great way to ensure you won't have to rely on RNG to get the gear you need!
Layout
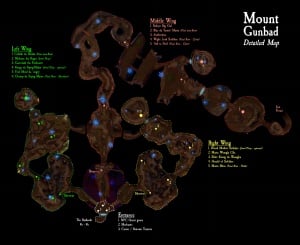
Gunbad features three wings: Left, Right, and Middle. These three can be completed in any order.
Each of the three wings includes at least one Optional Boss, which drops additional loot but can be skipped if the party would like.
To fight the final boss of each wing, you'll need to kill the bosses prior to it in order to open the magical barriers that allow entrance.
Lore
Although Ekrund may have been the richest mine beyond the Worlds Edge Mountains, Gunbad was the greatest and wealthiest of the world - only the biggest fortresses of Karaz Ankor produced more riches.
Located on the eastern slopes of the Worlds Edge Mountains, Gunbad was, and still is the only source of Brynduraz ("shining stone" in Khazalid), a blue gem much valued by Dwarf jewellers. Its gold was so crucial for maintaining the Dwarf army that during the War of Vengeance against the High Elves it wasn't forced to supply troops. But the Dwarfs didn't realize their greatest enemy would come from the East.
While the bulk of the Dwarf armies were still returning from their victorious campaign against the Elves, disaster came over the Worlds Edge Mountains. Earthquakes covered the mountain passes with rubble, isolating temporarily holds and mines. Gunbad Dwarfs fought valiantly when the Greenskins came, but defeat was inevitable. Over two hundred years ago, Dwarfs came back to Gunbad in great numbers. Led by Logazor Brightaxe, they managed to retake the mines, but this victory left Gunbad isolated in the midst of a land still riddled with Orcs and Goblins, which turned it into a tempting and vulnerable goal. It was just a matter of time before Dwarfs were forced to relinquish their dominion over Gunbad once more. After this defeat, Dwarfs haven't had enough strength to retake the mines to the East of the Worlds Edge Mountains.
Quests
Quests in Mount Gunbad reward the Redeye Set. These can be picked up from an NPC with a blue icon above its head. The quests will reward you with the individual pieces after certain bosses three times. The quests marked with a green icon do not reward the set and some may not work as of yet.
Legacy Boss Guides
Final Boss
Middle Wing
- Redeye Big Oaf
- Blaz da Tamin' Masta (& Velkyrix)
- Arathremia
Final Boss
Left Wing
- Griblik da Stinka
- Bilebane the Rager
- Garrolath the Poxbearer
- Kurga da Squig-Maker
- Foul Mouf da 'ungry
Final Boss
Updated Boss Guide
The guides below are new and are still WIP. Some may be missing and will be added soon! In the meantime, you can reference the legacy guides, above.
Left Wing
The left wing has Four Bosses and Two Optional Bosses. If mechanics are working properly, this is by far the most difficult wing in the entire dungeon, due purely to its final boss.
At the time of writing this wiki page, the final boss in the Left Wing is bugged and not all mechanics are working properly, which makes it a relatively easy tank-and-spank.
From the entrance, head Left and across the bridge to start your path to the first pair of bosses. Clear the adds and once you enter the first large room, take a left and head to the Healer NPC.
You can drop off behind the healer NPC and survive the fall if you're careful, so do this in order to skip a number of mobs.
Clear the nearby mobs and note that the first boss is just ahead of you!
First Boss: Griblik Da Stinka
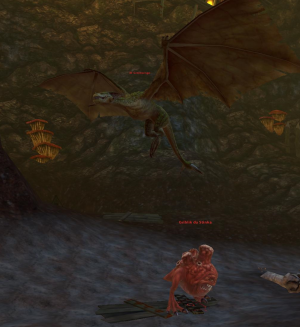
Girblik Da Stinka is actually a dual-boss fight, and your party can handle it a few ways:
- Have a solo tank pull and hold both bosses at once.
- Have an off-tank pull the Wyvern boss and keep it away from Griblik.
- Have a sturdy DPS or Healer pull the Wyvern boss and keep it away from Griblik.
Any of these combinations can work depending on your gear and team composition, so feel free to adapt if you need to. Remember: there's no single "right" way to clear most bosses.
Key Mechanics:
- Focus down Griblik, the Squig boss, first. Once he's dead, you can skip killing the Wyvern and just run to the next boss to leash it, if you'd like.
- The Wyvern boss will spawn Eggs during this fight. Avoid using AOE damage or direct damage here, as these eggs will pop, causing a number of baby champion Wyverns to get very friendly with your face. (This is bad.)
- Your cooldowns will get constantly increased on this fight, and you'll get pulled into the air. Be ready for this and keep life-saving morales like Shield Wall (Tank) or your Healer's M3 absorb for those moments when things get rough.
Once Griblik is down, you can either burn the Wyvern or just skip it and move the group towards the next boss. (It'll leash as you approach the next boss, Bilebane the Rager.)
Second Boss: Bilebane the Rager (Optional)
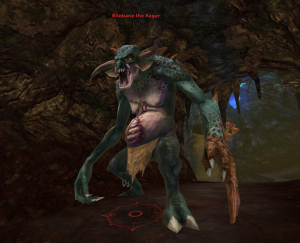
Bilebane the Rager is technically an optional boss, but almost every group kills him because he's very much in the way to the next boss.
Key mechanics:
- Tank him facing away from the group.
- Be ready to quickly heal the tank and those in melee range from sudden damage bursts.
Beyond that, he's a very easy boss. Bilebane the Rager drops Gunbad Jewelry, and has a chance to drop the rare purple variants.
Now, head into the next room to find...
Third Boss: Garrolath the Poxbearer
Garrolath the Poxbearer is the third boss of the Left Wing, and a relatively simple encounter.
Before fighting him, be sure to clear out the adds within the room so your party has some room to manuever.
Key Mechanics:
- Tank the boss with your back to the Waterfall / Wall behind him. This boss does large knockbacks, and this will keep you (and your dps) from getting flung too far.
- The boss will summon Nurgling champions. Your off-tank, sturdy Healer, or DPS should pull these Nurglings and keep them away from the boss while killing it.
- If the Nurgling and the Boss are kept near each other, the Boss will begin to heal considerably.
That's all for Garrolath - once dead, grab your bag and move on - an optional boss lies just ahead!
