Open RvR Guide
Open RvR Guide
Open RvR, or Realm Versus Realm, allows for both small-scale and massive battles of hundreds of players as each Realm attempts to gather supply, control objectives, and ultimately either siege or defend Keeps and Fortresses.
By capturing enough Keeps, realms can eventually push to attack an enemy Fortress. The Realm which captures the most enemy Fortresses over a 3-day window will then launch an attack on their enemy's Capital City.
This guide includes all the basics of the Open RvR Campaign, so please use it as a reference if you're learning or want to understand more of how the system works!
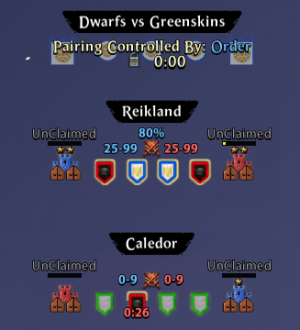
Supply Line / Active Zones

Return of Reckoning features three "Pairings", which are sets of zones where battles take place. Those are:
- Empire VS Chaos
- Dwarfs VS Greenskins
- High Elves VS Dark Elves
Besides Tier 1 (more info below), only one zone in a pairing will be active, and sometimes entire Pairings may be temporarily locked. The first zone active in each pairing is tier 2, which will progress to Tier 3 once locked, and then into Tier 4 once that is locked.
In Tier 4, a "Tug-of-war" campaign begins, with each Realm pushing the fight closer to the enemy Fortress by capturing a Zone. The campaign cannot move back into Tier 3, but the Tug-of-War can result in the battle constantly shifting back and forth between Tier 4 zones. When one realm finally captures a Fortress, that realm will gain a point for their Campaign status, and the Pairing will either lock or fully reset back to Tier 2.
If there's a Tie on Fortress Captures, the game will lock Two Pairings and leave only one open, in an attempt to force all fighting there and encourage a tiebreaker.
RvR Tiers
Tier 1
Tier 1 has no keeps. Tier 1 is solely fought over Battlefield Objectives, with 50 supplies (each contributing 2%) and capture of all Battlefield Objectives required to lock a zone.
Tier 2
Tier 2 introduces keeps with a single door which attackers must breach with a ram. Defenders have access to place Boiling Oil at the inner door. Once the door is destroyed, attackers must defeat the enemy Keep Lord.
With the Lord defeated, the keep must be held by attackers while their realm also captures three out of four Battlefield Objectives, and holds them for a minute or two to lock the Zone and move the fight to the next Tier.
Tiers 3 and 4
Tiers 3 and 4 feature larger keeps with outer walls, and Defenders may place oil at both the Outer wall and the Inner here.
Attackers must breach both the Outer Door and the Inner Door with a ram before engaging the Lord. Like previous tiers, attackers must then maintain control of the captured keep while also sending a force to hold at least three Battlefield Objectives to lock the Zone.
Battlefield Objectives & Resources
Controlling Battlefield Objectives causes supplies to appear around these flags for your realm. Once your faction holds at least two Battlefield Objectives, supplies will spawn every 40 seconds at each. Higher ranked keeps require more than two Battlefield Objectives to be held, with Three Objectives needed for a 3-star Keep, and all Four for a Four-star keep.
Capturing
Battlefield Objectives will capture for your realm faster if more people are around the Objective. You'll see a timer counting down when on an objective, and once this timer finishes, the objective will be captured for your faction.
Supplies
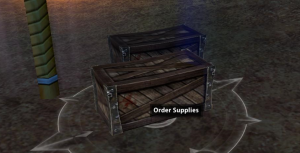
Supplies will spawn randomly around your Objective flags roughly every 40 seconds. When carrying supplies, a character will have a large beam of light around their character, which is blue for Order and Red for Destruction.
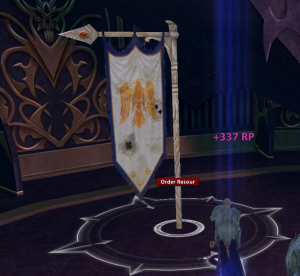
Once you have supplies, bring them to either your Keep or your Warcamp and look for the Resource turn-in flag to contribute them to the fight. This will grant experience, Renown, and Influence for all members of your party who are nearby.
Supplies turned in at the Warcamp instead of a Keep result in only 50% contribution towards ranking up the Keep, but do still grant full Exp/Renown/Influence numbers. If you're trying to rank up your keep, it's fastest to turn them in directly at the Keep.
The value of supplies depends upon the following factors:
- Rank of the keep.
- Number of players present in the area, to a limit which depends on the current keep rank. The more players are present, the more deliveries are worth.
- The internal population imbalance scaler (referred to as internal or delayed AAO.)
- Distance of the host Battlefield Objective from the target. Supplies from further away are worth more.
- Destination. Supplies returned via the warcamp have a 50% transportation penalty.
If you leave the RvR area while carrying supplies, you'll see a warning to return, and the supplies will decay if held for too long outside of the RvR lake.
Supplies can be dropped when a player is attacked. The base chance to drop supplies is 50%. This value is reduced by 25% if you are Guarded, and is further reduced by 5% for every group member within 100 feet of you. A 6 man group with a Guarded carrier will therefore not drop supplies when hit. A player may interact with dropped supplies to steal them, becoming the new carrier. If dropped supplies are not claimed quickly enough, they will decay.
Enemy Supplies
You can confiscate enemy supplies by interacting with them, which will destroy the supplies and prevent the enemy Realm from gathering them.
Additionally, all allies close to enemy supply will gain a small amount of Experience, Renown, and Influence for each. This is given to all allies, including those outside your party. The range is tiny, so make sure everyone is very close first before capturing them.
Keeps
Each Realm owns a keep in each contestable zone in Tiers 2, 3 and 4. Keeps form the focal point of the campaign in those zones, and a zone can be won (locked) by a realm when they capture the opposing realm's keep and lock three battlefield objectives while maintaining that captured keep.
Keep Rank
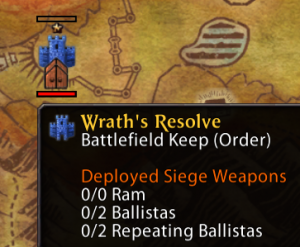
Each keep has a rank, which is advanced by returning supplies to that keep or to the warcamp. This rank controls the resilience of the keep door against cannon fire, the number of siege weapons the keep can support on the field, and the delivery rate of replacement siege weapons. A rank requires both a certain level of supplies in reserve (indicated by a yellow bar above the keep) and enough players on either the allied or the enemy realm to satisfy the rank population requirement.
Ranks can be lost as well as gained. If supplies have not been returned to a keep within 10 minutes of the last delivery (or a shorter period if the keep's rank is above 0), or the population of both realms falls too low, the keep will consume reserve supplies to sustain itself at a rate of 10% per minute. If not enough supplies are available in the bar to satisfy the upkeep, the keep's rank will fall. Keeps will reset the progress to their next rank if all of the battlefield objectives within a zone fall into enemy hands.
Delivering supplies to a warcamp (in tier 4 only, tiers 2 and 3 do not have resource capture points at warcamps) provides only half the gain to the next rank compared to delivering those supplies to the keep, but there are times when an objective is just too far from the keep, or the keep is unsafe, when delivering to the warcamp should be your aim.
Keep Upgrades (Star Ranks 0-5)
Base Keep (Zero Stars):
No cannons, artillery weapons, or rams can be used at this stage. Your goal for the zone will be to fight for battlefield objectives, while collecting and returning supplies as much as possible. To be capable of organizing a siege attack to lock the zone or a defense to remain in the zone. If a stalemate is reached either Realm can aim for a five star keep and controlling the battle objectives to lock the zone. (This rarely happens unless numbers are consistently even or there aren't enough players on either side for a defense or a siege. It is a last resort to progress to the next zone, and eventually a fortress/city siege.)
Note:
The more supplies you collect to increase the star rank of the keep the easier the zone will become to defend, and attack in if there are enough people to do so. Also keep in mind that supply progress can be reset if the enemy captures all four battle objectives, and "reserve" supplies can be used up based on several other factors that are mentioned in the "Keep Rank" section above.
When attacking with a higher level keep you will have access to more weaponry to speed up the siege. When defending, your attackers will have less access to your keeps postern doors, and vise versa based on enemy activity in the area. So group up, plan, organize, and strategize accordingly with your fellow realm members.
It is still valuable to collect supplies to play for a defense instead of an attack. Populations will always be a main factor to how fast or well these operations go for either Realm, Order or Destruction.
One Star Keep:
Allows up to 2 player dropped cannons and 2 artillery pieces to be used. (No extra fortifications to the keep defences, and no ram will be available until Star Rank 2)
Two Star Keep:
Allows for 3 player dropped cannons, 3 artillery weapons, and one ram to be used. A Guild Rank of 20 is required to use a ram.
Three Star Keep:
Locks the inner postern door of the keep to attackers, defenders may enter & exit freely. Allows for 5 player dropped cannons, 4 artillery weapons, and a ram to be used. Requires 3 or more battle objectives to be under control to open supply lines and generate supplies. (Melee DPS characters with the "Bypass" ability can still make it through the locked postern door.)
Note:
Organization with other players will be fully required at this point to progress and maintain your realms progression in the zone. Either with defense, supplies, or an attack.
Four Star Keep:
The outer AND inner postern doors become locked to attackers. Defenders may enter & exit both freely. 2 rams may be spawned at once. Requires all 4 battlefield objectives to be under control to open supply lines and generate supplies. (Melee DPS characters with the "Bypass" ability can still enter either of the locked inner or outer postern doors.)
Five Star Keep:
The zone will automatically lock once the keep hits 5 stars and that realm holds all 4 Battle Objectives.
Keep Doors
The entrance to a keep is barred by doors. These doors are highly resilient and cannot be damaged by attacks from players or creatures. Siege weaponry is required to break them.
If a door receives damage, the keep will enter an "attacked" state. During this time, the keep is considered "unsafe" and no repairs will be made to the door by the keep itself. To repair a door that is under attack, it is necessary to return supplies to the keep, which will be used on repairing the door.
When a keep door falls below 50% health members of the owning Realm can no longer use those doors and must instead use the postern doors. If a keep has not been subject to assault for a certain period, the keep will attempt to return to its "safe" state. During this state, the keep will attempt to consume supplies to repair any damage issued to its doors or replace any destroyed doors. If not enough supplies are available, the keep will remain unsafe until there are enough supplies to fully restore the doors.
Upon successfully defending a siege, a keep requires supplies to be delivered to repair the doors. If the outer door is down but the inner door is not then the inner door must be repaired, before a final supply is delivered to bring up the outer door. If both doors are down, a single supply delivery once the keep is deemed safe will bring up both doors.
Siege Weapons
Siege weapons can be bought from your realm's Foreman, located in the gatehouse of the keeps outer wall. A siege weapon need only be bought once (with the exception of oil, which is consumable); using the item from your inventory constructs said siege weapon for you if the parameters for spawning it are correct.
In order to deploy a siege weapon, the following conditions must be satisfied:
- You are within a certain radius of an allied keep.
- The keep has a weapon of that type in reserve for you to use. The cap and rate of delivery for siege weapons varies with keep rank.
All siege weapons except oil are movable - either by towing (wheeled) or by carrying (tripod / static). To tow or carry a siege weapon, mount and then right-click it. To deploy it, dismount and then right-click it while on foot. While towing a siege weapon, you will move more slowly, but you cannot be dismounted.
The following siege weapons are available:
Cannons
Cannons inflict high damage to players and to other siege weapons. They inflict minor damage to doors. They come in two types: single target and line-attack. The Heavy Dwarf Cannon and Heavy Chaos Hellcannon are purely single target, but inflict double damage. The Heavy Empire Cannon, Heavy High Elf Ballista, Heavy Greenskin Supa-Chucka and Heavy Dark Elf Ballista all perform a line attack, striking all targets along the weapon's shot vector. The deployable versions of all of these siege weapons replenish ammunition on a set interval depending on the amount of battlefield objectives your realm holds (one shot per objective held per tick). Stationary versions of these weapons can be found atop towers of keeps, these have infinite ammunition, and the type is dependent on the pairing/zone.
To fire a cannon, right click on its model after it has been deployed (make sure you are unmounted and it is no longer being towed, or you will start towing it yourself). Once the cannon has been right clicked, select the crosshair icon to go into first person view. Cannon shots become more powerful as the crosshair becomes smaller, moving the mouse rapidly causes the crosshair to expand as opposed to aiming slowly which has minimal effect.
Artillery
Artillery inflicts high damage to groups players and low damage to other siege weapons. They inflict minimal damage to doors, and can fire right through them. The damage of an artillery weapon increases the more enemies are concentrated around the spot at which it is fired. Artillery weapons inflict a stacking snare (suppression/pin) if enough targets are in the area, and the effectiveness of this snare increases further if the density of players is exceptional. Artillery weapons consist of the: Heavy Empire Hellblaster, Heavy Dwarf Organ Gun, Heavy High Elf Repeating Ballista, Heavy Chaos Tri-Barrel, Heavy Greenskin Rock Lobba and Heavy Dark Elf Repeating Ballista. The deployable versions of all of these siege weapons replenish ammunition on a set interval depending on the amount of battlefield objectives your realm holds (one shot per objective held per tick). Stationary versions of these weapons can be found atop towers of keeps, these have infinite ammunition, and the type is dependent on the pairing/zone.
Artillery weapons cannot hit a target if there is no arc of effect to the target. You must be able to see the attack spot or have an arc of effect to it to fire. This results in the majority of stationary artillery pieces on keep towers to be unusable.
To fire an artillery piece, right click on its model after it has been deployed (make sure you are unmounted and it is no longer being towed, or you will start towing it yourself). Once the artillery piece has been right clicked, select the crosshair icon to go into first person view. Aiming artillery is different from aiming cannons, aiming is done through a red crosshair that appears on both the ground and your minimap, this crosshair can be extended outwards or drawn in towards you by using the scroll wheel. A windage meter will appear in the top right of the screen, the artillery shot will scatter away from your targeted location depending on the direction and length of the red arrow on this meter.
Rams
Rams are the only real means of destroying a door, dealing damage equal to 2.5% of the doors hit points per full swing. A ram must be towed to the enemy keep door, and will automatically align itself when deployed within range. The best method of ensuring this automatic alignment takes place is to run directly at the door from straight ahead at a 90 degree angle. Approaching from a wide angle can and does prevent proper placement of the ram. Physical melee attacks deal great damage to a deployed ram where as magical and physical ranged attacks are ineffective. Cannon fire is also ineffective to a deployed ram, although it is very effective against a ram being towed. If the ram is too far away from the player who originally spawned it, it will start taking severe damage over time until it is destroyed. To avoid this, keep a person on the ram even when it is not docked on the gate (if you know that the original spawner is no longer present).
Once the Battering Ram is docked onto the enemies keep door, up to four players can perform the ram swing minigame. The first player to engage with the deployed ram is designated as the "swing leader", the swing leader initiates the backswing of the ram. Once the swing has been started, the other players on the ram must time their mouse clicks to gain maximum damage inflicted upon the door. It is often better to aim for a percentage in the low nineties than it is to go for one hundred percent, as latency can cause the swing to roll over and become a fifty.
In order to deploy a ram, you must be in a guild. If in Tier 4, your guild must be at least Rank 20. A Battering Ram can be spawned from your realm's keep once it has been upgraded to two stars. Once your realm's keep has been upgraded to four stars, you can have two rams spawned simultaneously.
Oil
Boiling Oil is a defensive siege weapon that is used to prevent attackers from crossing through the keep gates. This consumable siege weapon costs 5 gold per deployment. Obtaining kills with oil pours rewards no renown or kill credit. To use Boiling Oil go to the top of the gatehouse and use the consumable oil in your inventory next to the deployment node. The Boiling Oil will spawn in the upright position and ready to pour, to do so, you must right click on it and press the crosshair icon. This is most effectively used when the ram is first placed on the door, and as soon after as possible as long as the door is still above 50%. The defenders may go out the gate and attack the ram while under the cover of oil. Boiling Oil below 50% should be saved for when the gate is going to go down and poured when the attackers pushing inside the gate to kill as many enemies as possible. After the oil has been destroyed it has a respawn of 3 minutes and can be spawned at any keep rank, and can only be spawned at keeps your faction owns.
Orcapults
Orcapults are a special variety of artillery, instead of firing a projectile that damages enemies, it fires you! To acquire an Orcapult, you must either complete a repeatable quest in Karaz-a-Karak (Doorstep to Home, from King Belegar Ironhammer at (28538, 26552)) or Karak Eight Peaks (Best Bashin' We'z Gunna Get, from Grumlok at (32655, 41410)), alternatively you can gain one from the final reward tier of the Weekly RvR Warfront. Orcapults decay over a 7 day period after they are redeemed.
Source
You can find original post by clicking here.
Guide is written by Azarael ( Return of Reckoning Core Developer )


