Lost Vale: Difference between revisions
No edit summary |
No edit summary |
||
| Line 170: | Line 170: | ||
Ahzranok is a giant lizard that lives on the coast of the Island. This is a fairly straightforward starting fight that requires players to balance both egg mechanics and aggro. Her mate, Lurquasss, is never far and will join the fight after enough time passes. | Ahzranok is a giant lizard that lives on the coast of the Island. This is a fairly straightforward starting fight that requires players to balance both egg mechanics and aggro. Her mate, Lurquasss, is never far and will join the fight after enough time passes. | ||
Key Mechanics: | Key Mechanics: | ||
* Hatching Eggs | |||
* True Damage: This boss will periodically deal 50% of the Tank's HP in a single strike. | |||
* Heal Debuff: The boss will apply a heal debuff onto its current target. | |||
* Aqua Vortex: AOE damage on the party. This can be interrupted. | |||
Revision as of 13:24, 4 August 2025
Lost Vale
The Lost Vale is one of the largest and most difficult Dungeons in Return of Reckoning.
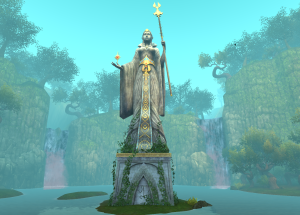
In this Dungeon, players arrive on the Isle of Rebirth to try and rescue or capture the Everqueen of the High Elves, Alarielle.
This Dungeon was rebuilt by the RoR Team in 2025, and took roughly 7 months to create.
The team rebuilt and restored many of Mythic’s original Dungeon ideas, and also added new mechanics, updated abilities, new armor and weapons, and wrote and added an entirely new story with the help of the Voice Acting talent first heard in 2024’s Dragonback Pass.
Before challenging the Dungeon, it is recommended to be in Invader, Bloodlord, or equivalent gear. The Dungeon difficulty is tuned around parties having at least this level of gear when facing the bosses.
Darkpromise Armor
Lost Vale awards players the Darkpromise Armor set, which, new from previous Dungeons, comes in the form of 3 different sets that a player may choose from. These sets are:
- Main Spec (Defensive for Tanks, Healer focused for Healers, Damage focused for DPS)
- Off Spec (Offensive for Tanks, Offensive for Healers, Survival focused for DPS)
- Hybrid Spec (A mix of both of the above sets, with a special group focused bonus included in the set bonus)
When killing a Boss, a piece of Broken Darkpromise gear can be looted from it. The class this piece is for is randomized, and pulls only from the present classes within your party.
Like other PvE Dungeons, you can also get a guaranteed piece of Darkpromise armor (even if your RNG is bad) by taking the repeatable quests found from NPCs at the very start of the Dungeon. Like Bastion Stair, these require 4 kills of a boss to earn.
This Broken piece can then be taken back to the vendors at the start of the Dungeon on the beach, and traded to them for a piece in the set the player wants to earn. Each Vendor has a different set of armor.
For a full list of the Darkpromise Sets and their set bonuses, please check out the Darkpromise Set armor page.
New Liniments

Lost Vale adds in a number of new permanent Liniments into the game.
Many of these are 30 minute versions of the previously event exclusive liniments from Pie Week and the Great Feast live events, making it possible now for players to get these even if they aren’t around during the live events.
The ingredients for these new Liniments can be found via:
- Seeds: 10% Drop chance on all bosses, higher drop chance from Treekin or Dryad bosses
- Butchering: 100% drop chance from specific bosses, can only be looted once per run
Expand the table below for a full list of new liniments which can be created in the Dungeon:
| Liniment Name | Effect | Produced Via |
|---|---|---|
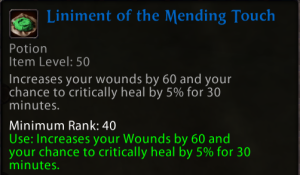
| Liniment of the Mending Touch | Wounds +60 & Chance to Critically Heal +5% for 30 Minutes | Cultivating + Apothecary |
| Liniment of the Bastion | Toughness +60 & Block Chance +3% for 30 Minutes | Cultivating + Apothecary |
| Liniment of the Unblockable Warrior | Melee Crit +5% & Block Strikethrough +3% for 30 Minutes | Cultivating + Apothecary |
| Liniment of the Roiling Storm | Magic Power +50 & Disrupt Strikethrough +3% for 30 Minutes | Cultivating + Apothecary |
| Liniment of the Sniper | Ballistic Skill +60 & Dodge Strikethrough +3% for 30 Minutes | Cultivating + Apothecary |
| Liniment of Abundant Healing | Willpower + 60 & Healing Crit +5% for 30 Minutes | Butchering + Apothecary |
| Liniment of Iron Scales | Initiative +60 & Incoming Crit damage reduced by 10% for 30 Minutes | Butchering + Apothecary |
| Liniment of One Hundred Eyes | Wounds +60 & Range Power +50 for 30 Minutes | Butchering + Apothecary |
| Liniment of Swirling Magic | Intelligence +60 & Decreased chance to be disrupted by 3% for 30 Minutes | Butchering + Apothecary |
| Liniment of the Raging Juggernaut | Melee Power +50 & Parry Chance +3% for 30 Minutes | Butchering + Apothecary |
Like other Liniments, these are unbound and tradeable, and can be gifted or sold to other players.
Rings
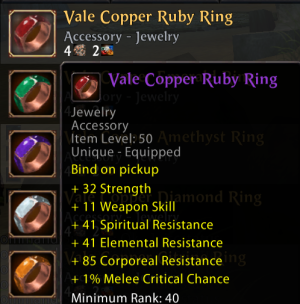
New Rings, similar in nature and spec to the Twilight's Tide Rings, can be earned in the Dungeon by acquiring certain materials and items from bosses.
These were added after player feedback requesting a close equivalent to Twilight's Tide rings be added as a permanent addition to the game.
These rings are slightly weaker than the Twilight's Tide versions, but still close in overall stats and they maintain the crit chance or special stat bonus that makes the rings unique for many builds.
Earning Vale Rings
Like the Twilight's Tide Rings, players can acquire a metal (which determines a Ring’s magic defense stat) and Gemstones. Unlike the Twilight's Tide event, players do not need to get lucky with a specific Gemstone type, and only need "Vale Gemstones" regardless of the ring they want.
The materials needed per ring are:
- 4 of the same Ore type (Copper, Silver, or Gold)
- 2 Vale Gemstones
Differences between Metal types:
- Copper offers higher Corporeal resistance
- Silver offers higher Spiritual resistance
- Gold offers higher Elemental resistance
As every character in the game deals different types of damage, you can specialize these rings to offer slight damage reductions against the classes you find most troubling to fight in PvP. (Iron and Platinum rings remain Twilight's Tide exclusive.)
- Specific bosses in the Dungeon will drop the materials needed to trade for these from the vendors, whom are located at the Dungeon's beach entrance.
- There is a guaranteed amount of materials which will drop per run, which are bound and rolled upon by party members.
- If you like, your party can funnel ring resources to specific players by passing on them.
- Players who look for secrets might have a higher chance of earning additional materials.
Finally, every boss in the Dungeon also has a rare chance of dropping an additional material for a ring, even if they have already dropped another.
Voice Acting
The Voice acting talent for Lost Vale features an entirely new cast for almost all key characters, and even some bosses, expanding significantly on the new voicework first added in Dragonback Pass, and making Lost Vale the most voiced Dungeon ever created for the game.
The RoR team would like to offer their sincere thanks to all of the Talent who donated their time and lent their voices to help bring the Dungeon to life. You can find a list of many of them below!:
[Click to Expand - WARNING! Spoilers!]
| Character | Voice Talent |
|---|---|
| Handmaiden Emrala | k1zz0 |
| Rolf | Perseus (@yourpalbrandon - Discord) |
| Dwarf Smith Sammog | Zander Heikkila (Twitch - zheiplays, Artstation - zheicreates) |
Dungeon Guide
The following is a list of boss mechanics within the Dungeon.
While the Dungeon is new, this list will explain the earlier bosses in detail, but will not offer guides for later bosses until parties have had time to learn it themselves.
For groups have difficulty with the later fights, there will be a number of player guides created soon after the launch, so don't be afraid to check those!
Key Mechanics (All bosses):
- Enrage Timer: Every boss in Lost Vale has a 6 minute Enrage timer. If not met, the boss will enrage and wipe the group.
- True Damage: Almost every boss in Lost Vale will deal some form of true damage to players, usually the tank. This is damage that cannot be blocked or reduced, and must be healed.
IMPORTANT: BEFORE YOU ENTER THE DUNGEON:
- Lost Vale is one of the most challenging Dungeons in the game, by design.
- Some fights, especially near the end of the Dungeon, require strong teamwork and coordination. They are not easy.
- Almost every fight has a unique mechanic which must be respected.
- It is possible to clear the Dungeon in Vanquisher gear, but it is strongly recommended not to use any gear weaker than Vanq. Especially in pug groups, going in under-geared will force extra pressure on your team.
Party Composition: Solo Tank or Dual Tank
- Every fight in the Dungeon is possible to clear both with a Solo Tank or with a Two Tank setup.
- Some fights are much easier with a third DPS, and some are much easier with a second Tank and the extra Guard.
- If running two tanks, an offensive-specced secondary tank can be very useful to help ensure your party meets the 6-Minute Enrage timer per boss.
Left Wing
Boss 1: Ahzranok
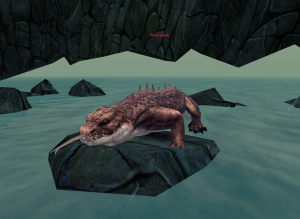
Ahzranok is a giant lizard that lives on the coast of the Island. This is a fairly straightforward starting fight that requires players to balance both egg mechanics and aggro. Her mate, Lurquasss, is never far and will join the fight after enough time passes.
Key Mechanics:
- Hatching Eggs
- True Damage: This boss will periodically deal 50% of the Tank's HP in a single strike.
- Heal Debuff: The boss will apply a heal debuff onto its current target.
- Aqua Vortex: AOE damage on the party. This can be interrupted.
Boss 2: Malghor Greathorn
Boss 3: The Darkpromise Beast
Boss 4: Dralel the Whitefire Matron
Right Wing
Boss 5: Chul Earthkeeper
Boss 6: Butcher Gutbeater
Boss 7: Gorak the Ancient
Boss 8: Sarthain the Worldbearer


